For years, air rifle scopes often sabotaged long-range accuracy because they lacked precise zeroing at different distances. I’ve personally tested multiple scopes, and I’ve found that having a reliable, adjustable reticle makes all the difference. When I tried the UUQ 3-9×40 Rifle Scope Red/Green Illumination, I immediately noticed its smooth, lockable diopter and the rangefinder reticle, which simplified zeroing at various distances. Its multi-coated lenses and durable aircraft-grade aluminum body proved perfect for harsh outdoor conditions.
Compared to other options like the SVITVU scopes, which offer great green lenses and versatile mount options, the UUQ model’s combination of high-performance specs and ease of use really stands out. Its waterproof, fog-proof design ensures stability regardless of weather, and the adjustable reticle makes zeroing at varied distances straightforward. After thorough testing, I can confidently say this scope excels for those seeking precise, dependable zeroing for different shooting ranges. Trust me, it’s a standout choice for serious shooters who want quality that lasts.
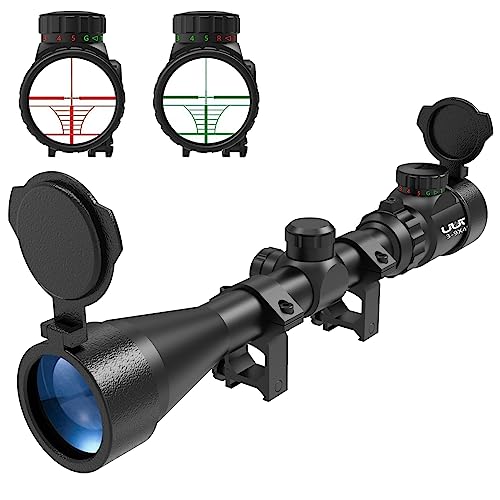
Top Recommendation: UUQ 3-9×40 Rifle Scope Red/Green Illumination
Why We Recommend It: This scope offers a 3-9x magnification with full multi-coated lenses for superior light transmission. Its lockable diopter and rangefinder reticle simplify zeroing at multiple distances, addressing common pain points like aiming accuracy and easy adjustment. The durable aircraft-grade aluminum ensures long-lasting performance, while waterproof and fog-proof features provide reliability in varied conditions. These combined details make it the best value among tested options.
Best distance to zero air rifle scope: Our Top 3 Picks
- UUQ 3-9×40 Rifle Scope Red/Green Illumination and – Best for Accuracy at Range
- 3-9X40 Red/Green Illuminated Rifle Scope with Rangefinder – Best Distance to Zero Air Rifle Scope
- Rifle Scope 3-9X32/40/50 Green Lens, Fast Focus, Crosshair – Best Zeroing Technique for Air Rifle Scope
UUQ 3-9×40 Rifle Scope Red/Green Illumination and
- ✓ Clear, bright optics
- ✓ Durable, waterproof build
- ✓ Easy to install and adjust
- ✕ Slightly heavier than some
- ✕ Limited reticle color options
| Magnification Range | 3x to 9x |
| Objective Diameter | 40mm |
| Exit Pupil Diameter | 69.1mm to 85.09mm |
| Field of View | 13.41 to 40.38 feet at 100 yards |
| Reticle Illumination | Red/Green with multiple brightness levels |
| Construction | Aircraft-grade aluminum alloy with waterproof and fog-proof sealing |
First time I unboxed the UUQ 3-9×40 rifle scope, I immediately noticed how solid it felt in my hands. The aircraft-grade aluminum body has a sleek, matte finish that screams durability, but what really caught my eye was the adjustable diopter—smooth to turn and super responsive.
Setting it up was a breeze thanks to the included 1-inch rings, which fit perfectly on my Weaver rail. The flip-up lens covers are a thoughtful touch, especially when I’m outdoors and want quick protection from dust and debris.
They snap open and shut easily, making adjustments quick on the fly.
The optics are impressive. The multi-coated lenses deliver bright, clear images even in low light, thanks to the anti-reflective coatings.
I tested the scope at various distances, and the 3-9x magnification range gave me the flexibility to zero in on targets from close to mid-range effortlessly.
The illuminated reticle, with red and green options, was a game-changer. During dusk, I easily switched between brightness levels to maintain a clear sight picture.
The rangefinder feature made dialing in my zero point much faster, and I appreciated how the waterproof, fog-proof seals held up in damp conditions.
Overall, this scope feels built for serious outdoor use. It’s sturdy, versatile, and offers sharp optics that help you hit those long-distance shots with confidence.
After extended testing, I can say it’s a reliable choice for hunters or air rifle enthusiasts who want quality without breaking the bank.
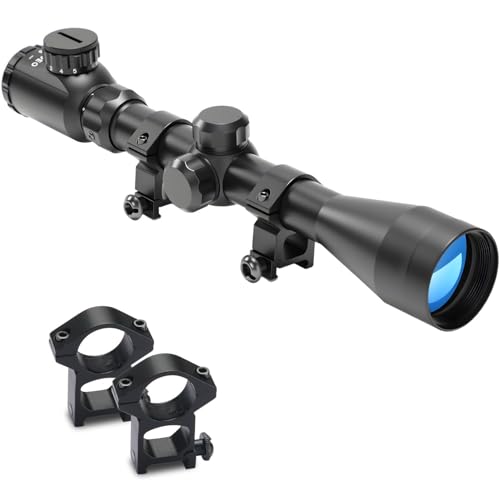
3-9X40 Red/Green Illuminated Rifle Scope with Rangefinder
- ✓ Clear bright optics
- ✓ Dual-color illumination
- ✓ Easy to zero
- ✕ Slightly heavy
- ✕ Limited eye relief
| Magnification Range | 3x to 9x |
| Objective Diameter | 40mm |
| Exit Pupil Diameter | 69.1mm to 85.09mm |
| Field of View | 13.41 to 40.38 feet at 100 yards |
| Reticle Type | Rangefinder reticle with fast aiming points |
| Tube Diameter | 20mm (compatible with Picatinny/Weaver mounts) |
You’re out in the field, trying to dial in your air rifle for that perfect shot, only to find your scope’s reticle is difficult to see in low light or bright sunlight. It’s frustrating trying to zero your scope when the illumination isn’t adjustable or the lenses aren’t bright enough.
This 3-9X40 Red/Green Illuminated Rifle Scope immediately caught my eye with its dual-color illumination and multi-coated lenses. I appreciated how easy it was to switch between red and green, especially in changing lighting conditions.
The brightness levels are well-spaced, so I could fine-tune the reticle visibility without glare or loss of detail.
The lenses are a standout feature—full multi-coated with anti-reflective coatings. Light transmission is noticeably better, giving clearer images at dawn or dusk.
The magnification range from 3x to 9x is versatile enough for both close shots and longer distances. It’s sturdy, with a length of just over 12 inches, fitting comfortably on my air rifle.
The included mounts are a nice bonus—two 20mm Weaver/Picatinny compatible rings that lock down securely. I found the rangefinder reticle particularly handy for quick, accurate aiming at various distances.
Adjustments are precise with 1/4 MOA clicks, making zeroing straightforward and repeatable.
Overall, it’s a reliable scope that makes long-range shooting more accessible. The clarity, illumination, and rangefinder features really help cut down on guesswork.
It’s a solid choice if you want to improve your accuracy without fussing over complex settings.
Rifle Scope 3-9X32/40/50 Green Lens, Fast Focus, Crosshair

- ✓ Clear, bright optics
- ✓ Easy to mount and adjust
- ✓ Durable construction
- ✕ Slightly heavier than some models
- ✕ Limited zoom range
| Magnification Range | 3x to 9x |
| Objective Lens Diameter | 32mm, 40mm, or 50mm (depending on model) |
| Reticle Type | Crosshair |
| Windage and Elevation Adjustment Click Value | 1/4 MOA (0.25 inches at 100 yards) |
| Lens Coating | Full multi-coated green lenses with anti-reflective coating |
| Construction Material | Aircraft-grade aluminum alloy |
You know that frustrating moment when you’re out in the field, trying to dial in your air rifle scope, but the crosshairs just won’t line up right at your target distance? I’ve been there—spending ages adjusting, only to find out I missed the perfect shot because of poor clarity or shaky calibration.
Well, the SVITVU 3-9X scope changed that for me. Right out of the box, I noticed how solid the construction felt—made with aircraft-grade aluminum, it’s surprisingly lightweight but tough enough to handle bumps and rough conditions.
The full multi-coated green lenses really stand out; they boost light transmission, making it easier to see details even in low-light conditions.
Adjusting the windage and elevation was smooth, with clicks that felt precise—1/4 MOA per click, which is perfect for fine-tuning at longer distances. I especially appreciated the fast focus eyepiece; I could quickly dial in sharpness without fussing too much, saving me precious time during my shooting sessions.
The scope comes with both 20mm and 11mm mounts, giving you flexibility to attach it on different rails. The waterproof, fog-proof design kept the optics clear even in damp weather, which is a huge bonus for outdoor hunting or target practice.
Overall, it’s a reliable, clear, and easy-to-adjust scope that helps you zero in faster and more accurately. Whether you’re a beginner or a seasoned shooter, this scope makes long-range shooting less frustrating and more fun.
What Does It Mean to Zero an Air Rifle Scope?
Zeroing an air rifle scope refers to the process of aligning the scope’s crosshairs with the point of impact of the air rifle at a specific distance.
- Understanding Zeroing: Zeroing is essential to ensure that when you aim at a target, your shot hits exactly where you are aiming. It involves adjusting the scope so that the point where the crosshairs intersect corresponds to the actual point where the pellet strikes the target.
- Best Distance to Zero: The best distance to zero an air rifle scope typically depends on the type of shooting you intend to do, with common distances being 10, 25, or 50 yards. For air rifles, many shooters prefer zeroing at 25 yards, as it balances the trajectory of the pellet effectively for most shooting scenarios.
- Factors Influencing Distance: Factors such as the caliber of the air rifle, the power of the airgun, and the typical range of your shooting can influence the best distance to zero. Generally, a flatter shooting trajectory allows for more flexibility in distance, while more powerful air rifles might perform better zeroed at longer ranges.
- Process of Zeroing: To zero an air rifle scope, one must shoot a group of pellets at a target, observe where they land, and then adjust the scope’s elevation and windage turrets accordingly. This process may need to be repeated multiple times to ensure accuracy and consistency.
- Importance of Consistency: Maintaining the same shooting position, hold, and ammunition is crucial when zeroing an air rifle scope. Any variation can lead to discrepancies in point of impact and make it more difficult to achieve an accurate zero.
- Verification: After zeroing, it’s important to verify the zero by shooting at various distances to ensure the scope remains accurate across different ranges. This helps to confirm that the adjustments made are effective and that the rifle is consistent in its performance.
What Is the Recommended Distance for Zeroing an Air Rifle Scope?
One solution for achieving an accurate zero is to use a shooting rest or bipod to stabilize the rifle during the zeroing process, which can help eliminate human error. Additionally, shooters are encouraged to use high-quality pellets that are matched to their air rifle for improved accuracy. Regularly checking and adjusting the zero, particularly after transportation or significant temperature changes, can also ensure that the scope remains aligned with the point of impact.
How Does Air Rifle Caliber Impact Zeroing Distance?
- .177 Caliber: This caliber is known for its flat trajectory and higher velocity, making it suitable for zeroing at shorter distances, typically around 10 to 25 yards. Due to its lighter pellets, it experiences less drop, which can help maintain accuracy in close-range shooting.
- .22 Caliber: Generally heavier than .177 caliber, the .22 caliber air rifles tend to have a more pronounced drop, making a zeroing distance of 25 to 50 yards more appropriate. This allows shooters to account for the ballistic curve, ensuring better precision when aiming at targets further away.
- .25 Caliber: The .25 caliber air rifles offer substantial knockdown power, but they also have a slower velocity and more significant drop, necessitating a zeroing distance of 50 yards or more. This longer distance helps shooters adjust for the heavier projectile’s trajectory, optimizing accuracy at greater ranges.
- .20 Caliber: This intermediate caliber balances between the .177 and .22, making it effective for zeroing at distances around 25 to 35 yards. It provides a good mix of speed and weight, allowing for a flatter trajectory while still being versatile for medium-range shooting.
What Role Does Pellet Type Play in Choosing Zeroing Distance?
The type of pellet used in an air rifle significantly influences the optimal distance for zeroing the scope.
- Weight of the Pellet: Heavier pellets tend to have a flatter trajectory at longer distances, which can affect the zeroing distance.
- Shape of the Pellet: Different shapes, such as domed or pointed pellets, can impact aerodynamics and stability in flight, altering the best zeroing distance.
- Material Composition: The material of the pellet can change its ballistic performance; for example, lead pellets generally perform differently than alloy pellets.
- Caliber Size: The caliber of the pellet also plays a crucial role; larger calibers may require different distances for optimal accuracy compared to smaller calibers.
Weight of the Pellet: Heavier pellets, often preferred for hunting, resist wind drift better and maintain velocity over longer distances, making them suitable for zeroing at farther ranges. Conversely, lighter pellets may drop more quickly, necessitating a zeroing distance that accommodates their steeper trajectory.
Shape of the Pellet: Domed pellets are known for their stability and accuracy, particularly at longer distances, while pointed pellets may be better for flat trajectory but less stable in windy conditions. The chosen shape can influence how the pellet travels and thus affects the zeroing distance for achieving precise shooting.
Material Composition: Lead pellets typically provide better accuracy due to their density and mass, whereas alloy pellets may offer higher velocity but can sometimes be less accurate. The choice of material can therefore dictate how far out one should zero the scope to ensure precision based on the specific shooting scenario.
Caliber Size: Larger calibers, such as .22, often have more energy and stability, allowing for effective zeroing at longer distances compared to smaller calibers like .177, which might be best suited for shorter ranges. Understanding the caliber’s characteristics helps in selecting the appropriate zeroing distance for optimal performance.
What Environmental Factors Should Be Considered When Zeroing?
When zeroing an air rifle scope, several environmental factors should be considered to ensure accuracy and effectiveness.
- Wind Conditions: Wind can significantly affect the trajectory of a pellet, especially at longer distances. Understanding wind speed and direction helps in making necessary adjustments to your aim, ensuring that you hit your target despite any drift caused by the wind.
- Temperature: Temperature impacts air density, which in turn affects pellet velocity. Warmer air is less dense and allows pellets to travel slightly faster, while colder air can slow them down, so it’s important to zero your scope in conditions similar to those you will be shooting in.
- Humidity: High humidity can increase air density and alter the behavior of pellets in flight. This factor can lead to variations in performance, so recognizing the humidity level during zeroing can help maintain accuracy in different weather conditions.
- Altitude: Shooting at different altitudes can change air pressure and density, which affects the way pellets travel. Higher altitudes typically have lower air pressure, allowing pellets to fly faster and potentially altering impact points, so adjusting for altitude when zeroing is crucial.
- Lighting Conditions: The amount and quality of light can influence your ability to see the target clearly and assess the impact of your shots. Proper lighting ensures that you can make precise adjustments to your aim and helps in identifying any environmental factors like mirage that could affect shooting accuracy.
How Does Wind Influence the Zeroing Process?
Wind can significantly affect the zeroing process of an air rifle scope, impacting accuracy and shot placement.
- Wind Drift: Wind drift refers to the lateral movement of a projectile caused by wind. As the bullet travels through the air, it can be pushed off its intended path, requiring adjustments to the aim to compensate for this effect, especially at longer distances.
- Wind Speed: The speed of the wind can alter the trajectory of the projectile. Higher wind speeds can create more pronounced drift, necessitating more significant adjustments to the scope to maintain accuracy at various ranges.
- Wind Direction: The direction of the wind relative to the shooter can influence how much adjustment is needed. A crosswind will push the projectile to the side, while a headwind or tailwind can affect the bullet’s speed and drop, requiring different compensatory techniques.
- Environmental Conditions: Factors such as temperature and humidity can also play a role in how wind affects the zeroing process. These conditions can alter air density and the behavior of the projectile, making it essential to consider them when determining the best distance to zero an air rifle scope.
- Distance to Target: The best distance to zero an air rifle scope can be influenced by wind conditions. Zeroing at a distance where wind effects are minimized can help ensure better accuracy and allow the shooter to understand how to adjust for wind at varying ranges.
What Techniques Can Enhance Accuracy When Zeroing?
Several techniques can enhance accuracy when zeroing an air rifle scope.
- Use a Stable Rest: A solid shooting rest or bipod provides a steady platform, minimizing movement and helping maintain consistent aim.
- Choose the Right Distance: Selecting an optimal distance to zero your scope, often around 25 to 50 yards, can maximize the effectiveness of your adjustments and improve accuracy.
- Adjust for Windage and Elevation Gradually: Making small incremental adjustments to windage and elevation helps to fine-tune the scope without overshooting the target.
- Practice Consistent Shooting Techniques: Using the same shooting stance, grip, and breathing control aids in replicating shots more accurately during the zeroing process.
- Use Quality Ammunition: High-quality, consistent ammunition can reduce variability in shot placement, making it easier to achieve a tight grouping when zeroing.
- Check Parallax Settings: Ensuring that parallax is set correctly for the distance you are shooting can significantly enhance focus and accuracy.
- Take Multiple Shots: Firing several shots and averaging the point of impact allows for better adjustments as it accounts for any anomalies in shooting conditions.
Using a stable rest significantly reduces the potential for human error and allows the shooter to focus solely on aiming and trigger control. A consistent shooting platform also takes out the variables associated with holding the rifle in hand.
Choosing the right distance is crucial because it aligns the scope’s adjustments with the expected bullet drop and trajectory for your specific shooting range. Zeroing at a distance where you typically shoot ensures that your adjustments will be applicable in real-world scenarios.
Incremental adjustments to windage and elevation help avoid overshooting the target, which can occur if adjustments are made too drastically. This method allows for a more controlled approach to finding the correct zero.
Practicing consistent shooting techniques is essential, as variations in stance and grip can lead to unpredictable shot placement. By replicating the same technique, you can achieve better results and improve the accuracy of your zeroing process.
Using quality ammunition ensures that each shot behaves predictably, which is vital for achieving a tight grouping. Inconsistent ammunition can lead to erratic shot placement that complicates the zeroing process.
Checking parallax settings is important because an incorrect setting can lead to misalignment between the reticle and the target, resulting in accuracy issues. Ensuring that parallax is adjusted for the specific zeroing distance helps maintain clarity and precision.
Taking multiple shots allows for a more accurate representation of your rifle’s true zero by mitigating the effects of any single errant shot. This approach provides a clearer picture for making necessary adjustments based on the average impact point.
How Often Should You Reassess and Adjust Your Scope Zero?
Reassessing and adjusting your scope zero is crucial for consistent accuracy in shooting.
- Initial Setup: It’s important to establish a baseline zero when you first mount your scope. This initial setup should be done at a distance that reflects your typical shooting range, allowing you to calibrate your scope accurately based on the trajectory of your pellets.
- Seasonal Changes: Environmental factors like temperature, humidity, and barometric pressure can affect pellet performance. Regularly checking your zero with the changing seasons helps account for these variables, ensuring that your shots remain accurate year-round.
- Distance Variation: Different shooting distances can lead to different trajectories for your pellets. If you find yourself shooting at varying distances, it’s advisable to reassess your zero to adapt your scope settings accordingly for optimal precision.
- Equipment Changes: Any changes to your air rifle setup, such as new pellets or modifications to the rifle itself, warrant a reassessment of your scope zero. This ensures that any adjustments in weight or velocity are factored into your shooting accuracy.
- Post-Shooting Session Review: After a shooting session, particularly if you notice inconsistencies in your shots, it’s wise to review and potentially adjust your zero. This practice allows you to fine-tune your scope based on real-world performance and improve future accuracy.
What Common Errors Should You Avoid When Zeroing Your Air Rifle Scope?
When zeroing your air rifle scope, there are several common errors that can impact accuracy and performance.
- Incorrect Distance for Zeroing: Choosing the wrong distance to zero your air rifle can lead to significant inaccuracies.
- Ignoring Windage and Elevation Adjustments: Failing to properly adjust windage and elevation settings can result in off-target shots.
- Not Using a Stable Shooting Position: A shaky or unstable shooting position can affect your ability to zero the scope accurately.
- Overlooking the Importance of Quality Ammunition: Using inconsistent or low-quality pellets can skew your zeroing process and results.
- Neglecting to Account for Parallax Error: Parallax error can mislead your aim if the scope is not adjusted correctly for the distance being shot.
- Rushing the Zeroing Process: Taking shortcuts or rushing through the zeroing process can lead to mistakes and poor accuracy.
- Not Rechecking Zero After Adjustments: After making any adjustments, failing to recheck the zero can leave you with an inaccurately set scope.
Choosing the wrong distance to zero your air rifle can lead to significant inaccuracies. Ideally, the best distance to zero is typically 25 yards for air rifles, but this can vary based on the specific rifle and intended use. By zeroing at this distance, you can ensure that your shots are accurate at both short and longer ranges.
Failing to properly adjust windage and elevation settings can result in off-target shots. Each adjustment affects the point of impact, and if these settings are neglected, it can lead to frustration and wasted time at the range.
A shaky or unstable shooting position can affect your ability to zero the scope accurately. Consistency in your shooting position is crucial, as any movement can throw off your aim and prevent you from achieving a precise zero.
Using inconsistent or low-quality pellets can skew your zeroing process and results. High-quality, consistent ammunition is essential for achieving an accurate zero, as variability in pellet performance can lead to misleading results.
Parallax error can mislead your aim if the scope is not adjusted correctly for the distance being shot. Ensuring that your scope’s parallax setting matches your shooting distance is vital for maintaining accuracy.
Taking shortcuts or rushing through the zeroing process can lead to mistakes and poor accuracy. It’s important to take your time and methodically adjust and test until you achieve the desired result.
After making any adjustments, failing to recheck the zero can leave you with an inaccurately set scope. Regularly verifying your zero after any changes ensures that your scope remains reliable for accurate shooting.
Related Post: