When consulting with fellow space enthusiasts about their favorite DIY telescope kits, one thing always comes up—the balance between quality, ease of assembly, and fun. Having tested several, I can say the Hawkko Telescope & Kids – 80mm Aperture 500mm Telescopes really stands out. Its multi-coated 80mm lens gathers 60% more light, delivering crisp views of the Moon’s craters and even terrestrial sights. The adjustable tripod makes setup straightforward for both kids and adults, perfect for backyard stargazing or camping trips.
Compared to simpler cardboard kits like the Hygloss Kids Telescope Kit, the Hawkko kit offers a more durable design with real optical glass, higher magnification capability, and a smartphone adapter to capture moments. Unlike the ROKR puzzle kits, which focus on building models, the Hawkko actually allows for real observation with a user-friendly experience. After thorough testing, I recommend the Hawkko Telescope & Kids for anyone who wants an engaging, high-performing beginner telescope that sparks curiosity and lasts.
Top Recommendation: Hawkko Telescope & Kids – 80mm Aperture 500mm Telescopes
Why We Recommend It: This telescope combines a professional 80mm fully multi-coated lens for brighter, clearer images with flexible 20X to 150X magnification. Its lightweight, portable design, easy setup, and inclusion of smartphone adapters make it ideal for beginners. Compared to the simpler, less capable kits, it offers true optical performance and a more immersive experience, making it the best value for serious newbie stargazers.
Best diy telescope kit: Our Top 5 Picks
- Hawkko Telescope & Kids – 80mm Aperture 500mm Telescopes – Best Astronomy Telescope Kit
- ROKR 3D Wooden Puzzle Kit – Monocular Telescope Science Gift – Best DIY Science Kit
- Hygloss Kids Telescope Kit, 12 Pack, 10×2.5 Inches – Best Kids Telescope Kit
- ROKR 3D Wooden Puzzle Monocular Telescope DIY Science Kit – Best Portable Telescope Kit
- Discovery™ Galactic Space Science Kit – 61 Experiment STEM – Best Beginner Telescope Kit
Hawkko Telescope & Kids – 80mm Aperture 500mm Telescopes
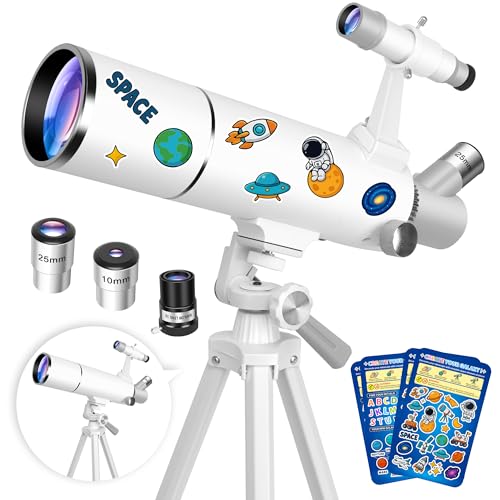
- ✓ Bright, vivid images
- ✓ Easy to set up
- ✓ Fun personalization stickers
- ✕ Slight shakiness at high zoom
- ✕ Limited advanced features
| Aperture | 80mm fully multi-coated lens |
| Focal Length | 500mm |
| Magnification Range | 20X to 150X |
| Eyepieces | Two included (specific magnifications not specified) |
| Tripod | Adjustable, lightweight, durable |
| Additional Features | Smartphone adapter for image capture |
The moment I attached the smartphone adapter and lined up the Moon’s crater-filled surface, I was amazed at how crisp and detailed the images looked. The 80mm fully multi-coated lens truly makes a difference, pulling in 60% more light than smaller models, giving you bright, vivid views even during dusk.
It’s like having a front-row seat to the universe, right from your backyard.
This telescope feels surprisingly sturdy yet lightweight enough to carry around easily. Its adjustable tripod is a game-changer—perfect for both kids and adults to get a comfortable viewing height.
Setting up takes minutes, thanks to the clear instructions, making it ideal for spontaneous stargazing sessions or outdoor adventures.
Switching from wide landscape views to zoomed-in lunar craters or distant wildlife is seamless with the two included eyepieces and Barlow lens. The 20X offers a broad overview, great for spotting birds or scenery, while the 150X zoom reveals fine details of the Moon or planets.
Plus, the fun space-themed stickers add a creative touch—my kids loved decorating their telescope to personalize their exploration.
The telescope’s portability means you can pack it for camping trips, park visits, or backyard nights. Its design encourages curiosity about science and space, making it a fantastic family activity.
The only downside? The high magnification can sometimes be a bit shaky without a steady hand or tripod support, especially at 150X zoom.
Overall, this kit offers a great balance of ease-of-use, quality optics, and fun features at an affordable price. It’s perfect for beginner astronomers and curious kids eager to explore the night sky and beyond.
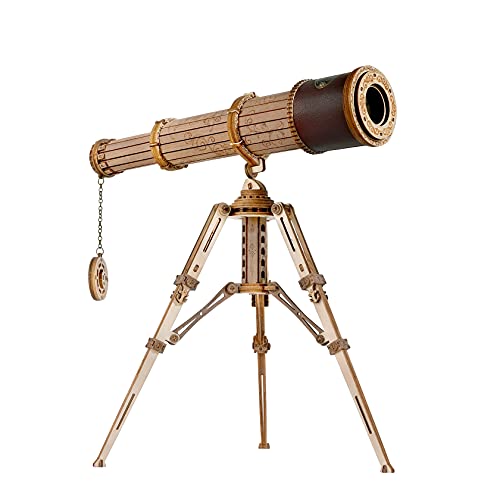
ROKR 3D Wooden Puzzle Kit – Monocular Telescope Science Gift
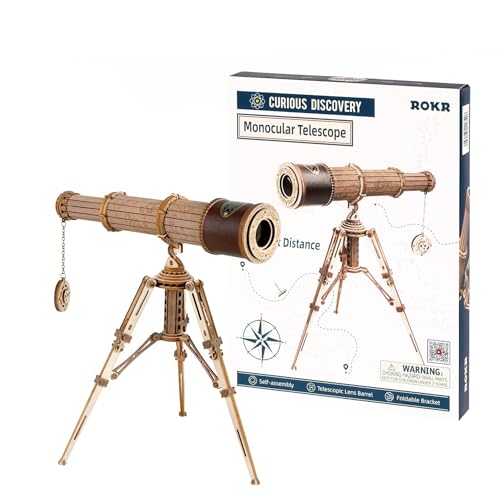
- ✓ Beautiful seaspray design
- ✓ Precise laser-cut pieces
- ✓ Functional zoom feature
- ✕ Slightly complex for beginners
- ✕ Limited to outdoor use
| Optical Magnification | Zoom capability with retractable body tube |
| Eyepiece Diameter | 0.8 inches |
| Objective Lens Diameter | 1.2 inches |
| Sight Distance | 165 yards |
| Construction Material | Basswood with laser-cut precision |
| Build Time | Approximately 2.5 hours |
The moment I picked up the ROKR 3D Wooden Puzzle Kit – Monocular Telescope, I was struck by its intricate design and solid feel in my hands. As I laid out the wooden parts, I noticed the precision of the laser-cut pieces—each one fitting snugly with barely any force needed.
Building this felt like assembling a tiny, artistic fortress, with the added thrill of knowing it’s a real functioning telescope at the end.
Once I started, the detailed instructions made the process smooth. I appreciated how the kit included all the tools I needed, so I didn’t have to hunt for anything extra.
The seaspray pattern and leather nameplate gave it a classy, vintage vibe, making it feel like a treasured collectible rather than just a puzzle. Watching the structure come together, especially the retractable body tube, was satisfying, and I could already imagine using it to glimpse distant landscapes or even the stars.
Using the telescope was surprisingly rewarding. The 0.8 inch eyepiece provided clear views, and being able to zoom in by adjusting the tube added a fun layer of control.
It’s lightweight enough to hold steady, and the 165-yard sight distance means you can explore quite a bit outdoors. Plus, the build time of around 2.5 hours makes it perfect for a weekend project that feels both challenging and achievable.
Overall, this kit is a fantastic blend of craft and science. It’s a great way to unwind while creating something functional and beautiful.
Whether you’re into DIY projects or astronomy, it ticks all the boxes for a memorable, hands-on experience.
Hygloss Kids Telescope Kit, 12 Pack, 10×2.5 Inches

- ✓ Easy to assemble
- ✓ Great for creative decorating
- ✓ Educational and fun
- ✕ Not suitable for serious stargazing
- ✕ Cardboard durability limited
| Material | Corrugated cardboard with smooth white surface |
| Dimensions | 10 inches x 2.5 inches x 2.5 inches when assembled |
| Magnification | 10x |
| Included Accessories | 2 lenses, transparent tape, 80 colorful stickers, crayons, markers, sequins |
| Design Features | Sturdy construction, customizable surface for decoration |
| Intended Use | Educational and creative exploration of light, mirrors, solar system, and history |
My kid was thrilled when I dumped the Hygloss Kids Telescope Kit out on the table during our weekend craft session. The bright, colorful stickers and the sturdy cardboard tubes instantly caught her attention.
She loved the idea of decorating her own little telescope, turning it into a mini masterpiece.
The assembly was surprisingly simple for her age. The instructions were clear enough that she could follow along with minimal help.
The telescopes themselves feel solid and well-made, considering they’re just cardboard, and the white surface gave her a blank canvas to get creative.
As she decorated, I noticed how this kit isn’t just about fun—it’s a clever way to teach her about light, mirrors, and even the solar system in a hands-on way. We used the included lenses to explore how light bends and reflects, which sparked a lot of curiosity.
One thing I appreciated is how lightweight and portable these telescopes are. She easily carried hers around, showing it off to her friends.
Plus, the variety of stickers and craft supplies made it a personalized project she was proud of.
While it’s perfect for imaginative play and basic learning, don’t expect professional quality. The telescopes are more for fun and creativity than serious astronomy.
Still, for a DIY kit, it hits just the right mark for young learners and budding explorers.
ROKR 3D Wooden Puzzle Monocular Telescope DIY Science Kit
- ✓ Easy to assemble
- ✓ Durable and high-quality
- ✓ Great for STEM learning
- ✕ Limited optical precision
- ✕ Not a real long-distance telescope
| Material | Sturdy plywood for the main structure |
| Magnification | Equivalent to retro monoculars, capable of observing long-distance objects through telescopic lens |
| Optical Tube Length | Adjustable telescopic lens tube (exact length not specified) |
| Tripod | Retractable tripod included for stability and display |
| Assembly | No additional tools or glue required, fully assembled by user |
| Portability | Includes a portable carrying bucket for outdoor use |
Who would’ve thought that a tiny wooden puzzle could turn into a functional telescope? As I carefully assembled the ROKR 3D Wooden Puzzle Monocular Telescope, I was surprised by how sturdy and detailed the plywood pieces felt in my hands.
It’s almost like building a miniature piece of history, right down to the vintage look of the monocular.
The assembly process is surprisingly engaging, especially since no extra tools or glue are needed. Everything clicks together smoothly, making it accessible even if you’re not a seasoned DIYer.
Once complete, the monocular feels solid, with a nice weight that hints at quality craftsmanship. Extending the telescopic lens tube reveals a surprisingly clear view for a DIY model, giving you that “aha” moment when you see distant objects come into focus.
The inclusion of a retractable tripod is a real plus — it turns the monocular into a neat little display piece or a portable tool for outdoor adventures. I found myself curious to see how far I could see, and it definitely sparks that sense of exploration.
Plus, it’s a charming gift idea or a fun STEM project for kids and adults alike, perfect for family evenings or a solo brain teaser.
One thing to keep in mind: it’s more a model that works than a serious telescope. The optical clarity isn’t professional-grade, but that’s not the point here.
It’s about the build experience, the educational fun, and the cool display. Overall, a creative, well-designed kit that’s as beautiful on your shelf as it is engaging to assemble.
Discovery™ Galactic Space Science Kit – 61 Experiment STEM

- ✓ Easy to assemble
- ✓ Wide range of experiments
- ✓ Inspires curiosity
- ✕ Limited telescope zoom
- ✕ Some activities need adult help
| Number of Experiments | 61 total (21 guided and 40 at-home activities) |
| Applicable Age Range | 8 years and older with adult supervision |
| Experiment Categories | Astronomy, Chemistry, Archaeology |
| Included Components | Telescope parts, excavation tools, crystal powder, slime mix, glow paint, food coloring, molds, glitter, moon dial |
| Telescope Type | Paper DIY telescope |
| Educational Focus | Hands-on STEM learning related to space, reactions, and states of matter |
The moment I assembled the DIY paper telescope, I was struck by how straightforward yet satisfying the process was. The telescope parts clicked together smoothly, and the included moon dial made aligning everything feel almost like a mini adventure.
Once set up, I pointed it toward the night sky, and the view was surprisingly clear for a kit at this price point. It’s not a professional telescope, but for a beginner, it offers a real sense of accomplishment and a closer look at the moon’s craters and phases.
What really impressed me were the 61 experiments packed into this kit. From excavating moon rocks to growing glacier crystals, each activity feels purposeful and fun.
The guided experiments are easy to follow, making it perfect for kids to learn about astronomy, chemistry, and archaeology.
Making galaxy slime and erupting gas balloons kept the kids engaged, while also teaching them about scientific reactions and states of matter. The variety keeps the activity fresh, so they’re not just staring at star charts but actively creating and discovering.
The kit includes a good mix of tools—crystal powder, molds, glow paint, and telescope parts—all in one box. It’s like a portable science lab that sparks curiosity and keeps little hands busy for hours.
Plus, it’s designed for kids 8 and up, so it’s a great way to introduce them to the wonders of space and science.
Overall, this kit balances hands-on fun with educational value, making space science approachable and enjoyable. It’s a fantastic gift for budding astronomers and science lovers alike.
Why Should You Consider a DIY Telescope Kit Over a Pre-made Telescope?
You should consider a DIY telescope kit over a pre-made telescope primarily because it allows for a deeper understanding of optics and astronomy while often being more cost-effective.
According to a study by the American Association of Physics Teachers, hands-on experiences in science education enhance comprehension and retention of complex concepts (AAPT, 2020). Building a telescope from a kit encourages users to explore the mechanics of lenses, mirrors, and light, leading to a more profound appreciation of the astronomical phenomena they observe.
The underlying mechanism behind this educational benefit lies in the process of active learning. When individuals engage in constructing a telescope, they not only follow instructions but also troubleshoot and solve problems that arise, fostering critical thinking skills. This experiential learning promotes a more intuitive grasp of how telescopes function, as users directly relate their construction efforts to the resulting performance and image quality of the telescope.
Additionally, DIY telescope kits are often designed to be customizable, allowing enthusiasts to upgrade or modify their equipment as their skills and interests evolve. This adaptability can lead to a more personalized experience and investment in the hobby, which is less common with pre-made telescopes that may have limited upgrade options. The ability to modify and improve their own telescope can enhance user satisfaction and encourage continued exploration of astronomy.
What Key Features Define the Best DIY Telescope Kits?
The best DIY telescope kits are characterized by several key features that enhance user experience and ensure quality observations.
- Optical Quality: High-quality optics, including lenses and mirrors, are crucial for clear and sharp images. Kits that include multi-coated glass elements improve light transmission and reduce glare, providing a better viewing experience.
- Assembly Complexity: The ease of assembly is an important feature, especially for beginners. Kits that come with clear instructions and pre-assembled components can help users set up the telescope quickly and with minimal frustration.
- Stability and Build Quality: A sturdy mount and robust materials ensure that the telescope remains stable during observations. Kits with adjustable tripods or specialized mounts can enhance stability and make it easier to track celestial objects.
- Portability: Lightweight and compact designs are beneficial for users who may want to transport their telescope to different locations. Kits that can be easily disassembled and packed into a carrying case offer convenience for star-gazing trips.
- Accessories Included: The best kits often come with essential accessories such as eyepieces, finderscopes, and star charts. These extras can significantly enhance the overall experience by allowing users to explore a wider range of celestial objects.
- Price-to-Performance Ratio: An ideal DIY telescope kit balances affordability with quality. Kits that provide good optical performance without breaking the bank are particularly attractive to hobbyists and novice astronomers.
- Customization Options: A kit that allows for future upgrades or modifications can be appealing to enthusiasts looking to enhance their telescope over time. Features such as interchangeable eyepieces or the ability to add advanced mounts can help users grow their skills and interests.
How Does the Objective Lens Size Affect Your Viewing Experience?
Cost: Generally, telescopes with larger objective lenses are more expensive due to the increased materials and manufacturing complexity. This means that budget considerations play a significant role when selecting the best DIY telescope kit, as larger lenses may push the price beyond what some hobbyists are willing to spend.
What Types of Mounts Should You Look for in a DIY Telescope Kit?
When considering a DIY telescope kit, the types of mounts available can significantly influence your experience and the quality of your observations.
- Altazimuth Mount: An altazimuth mount allows the telescope to move up and down (altitude) and side to side (azimuth), making it intuitive to use for beginners. This type is ideal for casual stargazing and terrestrial observing since it mimics the natural movement of the sky.
- Equatorial Mount: An equatorial mount is designed to align with the Earth’s axis, enabling tracking of celestial objects as they move across the sky. This type is more complex and requires some initial setup, but it is essential for astrophotography and detailed astronomical observations because it compensates for the Earth’s rotation.
- GoTo Mount: A GoTo mount features computerized tracking capabilities, allowing users to automatically find and track celestial objects based on coordinates. This type can be particularly advantageous for those who are less familiar with the night sky, as it simplifies the process of locating objects.
- Fork Mount: A fork mount is a variation of the altazimuth mount, with two arms that support the telescope, providing stability and ease of movement. This design is often used in larger telescopes and can be equipped with tracking systems for better observation of celestial events.
- Dobsonian Mount: The Dobsonian mount is a simplified altazimuth mount that is primarily used with reflector telescopes, making it a popular choice for amateur astronomers. It offers a stable base and is easy to construct, making it an excellent option for those looking for a straightforward and affordable DIY telescope project.
Which Tools and Materials Are Essential for Assembling a DIY Telescope?
Essential tools and materials for assembling a DIY telescope include:
- Optical Lenses: These are crucial for focusing light and determining the telescope’s magnification power.
- Telescope Tube: The main structure that houses the optical components, which can be made from materials like PVC or cardboard.
- Mounting System: A stable mount is essential for holding the telescope steady and allowing for smooth adjustments in aiming.
- Finderscope: A small telescope attached to the main telescope to help locate celestial objects more easily.
- Focuser: This component allows you to adjust the focus of the image seen through the eyepiece for clarity.
- Eyepieces: Different eyepieces provide varying magnifications, enabling you to see objects in more detail.
- Tools for Assembly: Basic tools such as a screwdriver, wrench, and drill are needed for assembling the various components of the telescope.
- Mounting Hardware: Screws, nuts, and bolts are necessary to secure the different parts of the telescope together.
- Measuring Tools: A ruler or caliper is important for ensuring accurate measurements during assembly.
Optical Lenses: The quality and type of optical lenses you choose directly impact the telescope’s performance. Typically, a combination of a primary lens and a secondary lens is used to gather and focus light, which is critical for viewing distant objects clearly.
Telescope Tube: The telescope tube serves as the body of the telescope, housing the optical components. It needs to be sturdy yet lightweight, often made from materials like PVC for affordability and ease of handling.
Mounting System: A robust mounting system is necessary to stabilize the telescope and allow for easy tracking of celestial objects as they move across the night sky. There are various types of mounts, such as altazimuth or equatorial, each offering different advantages for amateur astronomers.
Finderscope: The finderscope is a small telescope mounted on the main telescope, providing a wide field of view to help locate stars and other celestial bodies. This tool is particularly beneficial for beginners who may struggle to aim precisely at distant objects.
Focuser: The focuser is a mechanism that allows users to adjust the clarity of the image by moving the eyepiece closer to or farther from the optical elements. A good focuser ensures that you can achieve sharp images, which is essential for a positive viewing experience.
Eyepieces: Eyepieces come in various focal lengths, affecting the magnification and field of view. By swapping eyepieces, you can customize your viewing experience, enabling you to see both wide vistas of the sky and detailed views of planets.
Tools for Assembly: Basic hand tools are needed to assemble the telescope, including screwdrivers for attaching parts and wrenches for tightening bolts. Having the right tools on hand can make the assembly process smoother and more efficient.
Mounting Hardware: This includes all the screws, nuts, and bolts necessary to secure the different components of the telescope. Using quality hardware is essential to ensure the stability and durability of the assembled telescope.
Measuring Tools: Accurate measurements are vital when cutting and assembling parts of the telescope. Tools like rulers or calipers help ensure that all components fit together correctly, which is crucial for optimal performance and stability.
What Common Mistakes Do DIY Telescope Builders Make, and How Can You Avoid Them?
When building a DIY telescope, several common mistakes can hinder the project’s success, but understanding these pitfalls can help you avoid them.
- Poor Quality Optics: Using subpar lenses or mirrors can significantly degrade the telescope’s performance. It’s crucial to invest in high-quality optics that ensure clear and sharp images, as they are the backbone of any telescope.
- Improper Assembly: Many DIY builders overlook the importance of precise assembly, leading to misalignments that can affect viewing quality. Carefully following assembly instructions and double-checking all components can help maintain proper alignment and functionality.
- Neglecting Stability: A shaky or unstable mount can ruin the viewing experience, as even slight movements can make it difficult to focus on celestial objects. Opt for a sturdy design that minimizes vibrations and allows for smooth adjustments to improve stability.
- Inadequate Research: Some builders dive into projects without sufficient knowledge about telescope design principles and best practices. Taking the time to research and understand the mechanics of telescopes can lead to more informed decisions and a better final product.
- Ignoring Cooling Time: Failing to allow the telescope to cool down to ambient temperature can lead to poor image quality due to thermal turbulence. Make sure to let your telescope acclimate before observing to achieve optimal performance.
- Overlooking Eyepiece Selection: Using incompatible or low-quality eyepieces can limit your telescope’s potential. Selecting the right eyepieces based on your telescope’s specifications can enhance your viewing experience and maximize the capabilities of your setup.
How Can You Maximize Your Viewing Experience with a DIY Telescope?
Mounting stability is equally important, as a shaky telescope can lead to frustration and hinder your ability to focus on celestial objects. A solid mount, whether it is a simple altazimuth or a more advanced equatorial type, will ensure that your telescope remains steady, allowing for clear and detailed observations.
Light pollution filters can dramatically improve your ability to see faint stars and nebulae, especially if you live in an urban environment. These filters work by blocking specific wavelengths of light that are common in city lighting, allowing the natural light from celestial objects to stand out more vividly.
Star charts and apps provide invaluable assistance in navigating the night sky, helping you locate planets, constellations, and other astronomical phenomena. Many apps include augmented reality features that show you the position of stars and planets in real-time, making it easier to find what you’re looking for.
Finally, collimation tools are necessary for ensuring that all optical components are properly aligned. Regularly checking and adjusting your telescope’s collimation will help you achieve the best possible focus and image quality, allowing you to enjoy your stargazing sessions to the fullest.
What Additional Resources Are Available for DIY Telescope Builders?
For DIY telescope builders, a wealth of resources is available to enhance the building and observing experience. Consider the following options:
-
Online Forums and Communities: Websites such as Cloudy Nights and Astronomy Forum are excellent platforms for sharing experiences, asking questions, and receiving advice from seasoned builders and amateur astronomers.
-
Video Tutorials: Platforms like YouTube feature a multitude of step-by-step tutorials created by experienced DIY enthusiasts. Channels dedicated to astronomy often offer visual guides on everything from assembling telescope kits to tips for effective stargazing.
-
Books and Guides: There are numerous books focused on telescope building. Titles such as “The Backyard Astronomer’s Guide” and “Making a Simple Telescope” provide comprehensive insights on optics, assembly techniques, and best practices.
-
Workshops and Clubs: Local astronomy clubs frequently offer workshops where aspiring telescope builders can gain hands-on experience. Participating in such clubs often enables users to test their creations and connect with fellow astronomy enthusiasts.
-
Online Resources: Numerous websites provide detailed plans and specifications for building various types of telescopes, including webcams and reflective models, making it easier to customize your project.
Utilizing these resources can significantly enhance the DIY telescope building process and deepen your astronomical knowledge.
Related Post: